Windows 8 Can't Boot Into Safe Mode

Many times in order to remove a piece of spyware or for troubleshooting and diagnostic purposes, you'll have to start Windows in Safe Mode. While in Safe Mode, only specific programs and files needed to run the operating system are loaded. This will allow you to remove attempt to remove viruses, change bad drivers and other diagnostic tasks that cannot be removed in Normal Mode. Follow the instructions below to start Safe Mode for your specific version of Windows.


Set your computer to boot into Safe Mode. This step only works if your computer is currently able to access Windows normally. If you cannot access Windows, check the next step.
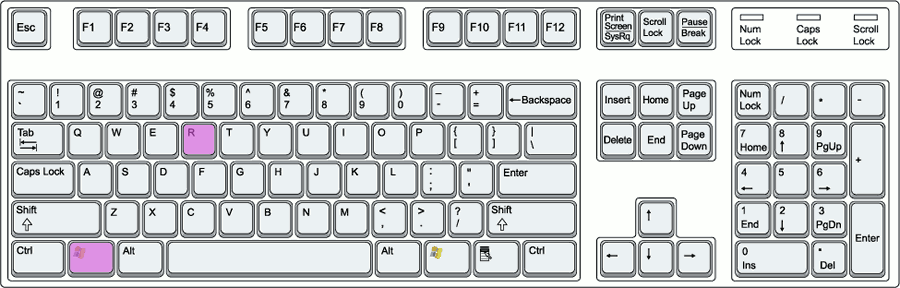
Open the Run dialog. You can access this by pressing the Windows + R keys.

Start Windows in Safe Mode Step 1Bullet1 Version 2.jpg

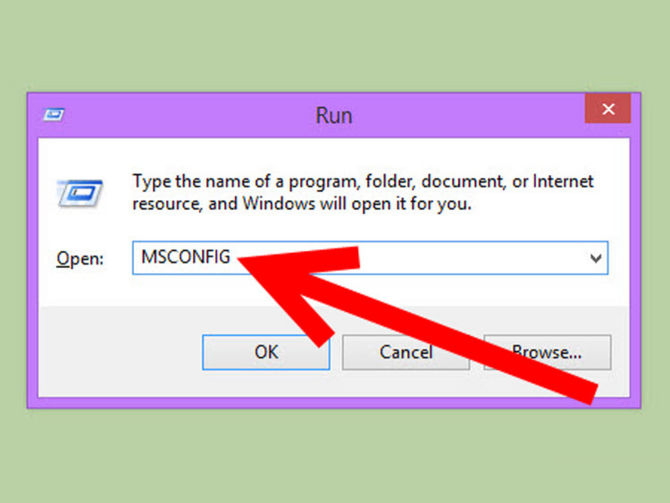
Type “msconfig” and press Enter.

Start Windows in Safe Mode Step 1Bullet2 Version 2.jpg

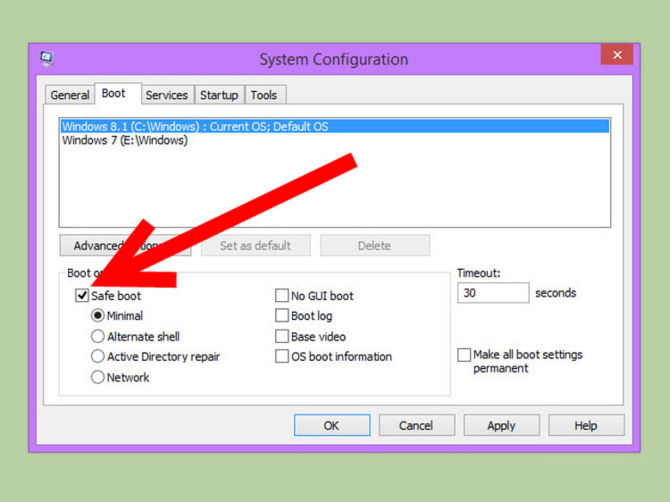
Click the Boot tab. Check the “Safe boot” box and select “Minimal” for a typical safe boot. Click Apply and your computer will boot into Safe Mode next time it restarts.

Start Windows in Safe Mode Step 1Bullet3 Version 2.jpg

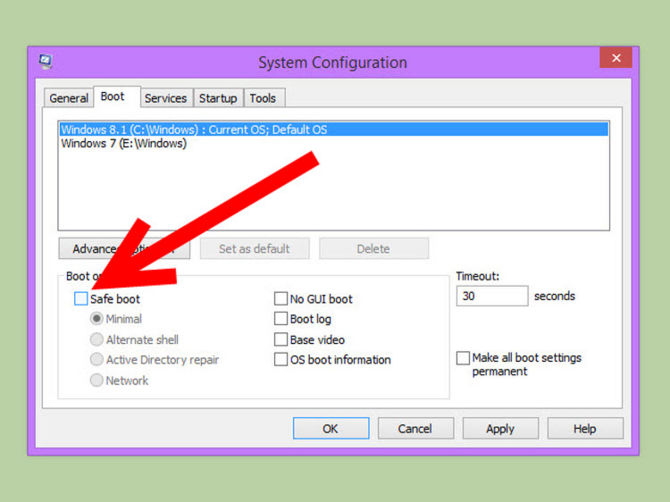
This will make your computer boot to Safe Mode every time. To undo it, repeat these steps and uncheck the “Safe boot” box.

Start Windows in Safe Mode Step 1Bullet4 Version 2.jpg

Start Windows in Safe Mode Step 2.jpg

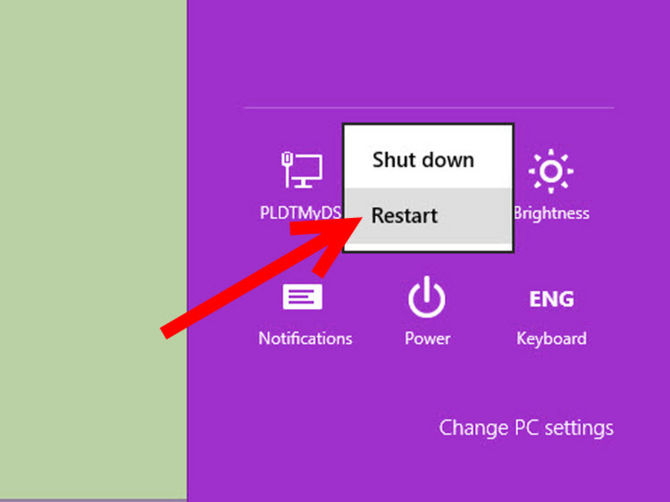
Click the Power button on the Sign-In screen. Use this method if you cannot sign into Windows properly. Hold the Shift key and click Restart from the Power menu. This will open the Startup Settings after the computer reboots.


Start Windows in Safe Mode Step 3.jpg

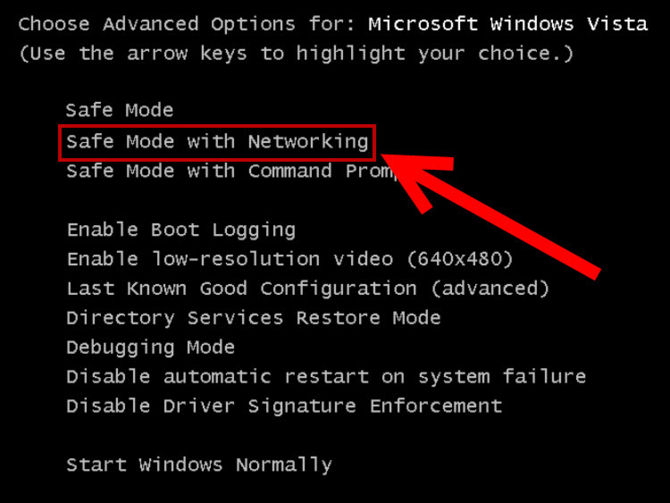
Select Safe Mode. Once you’re in the Startup Settings menu, scroll down and select Safe Mode with Networking from the list. If you think the network interface may be what is causing problems, you can open Safe Mode without it.

How To Check Who is Connected To My Wifi Router

Home wireless internet

Do you know who’s connected to your router’s Wi-Fi network? Take a look at the list devices connected to your Wi-Fi network from your router or computer to find out.
Bear in mind that many devices connect to your Wi-Fi these days. The list will contain laptops, smartphones, tablets, smart TVs, set-top boxes, game consoles, Wi-Fi printers, and more.

Use Your Router’s Web Interface

The best way to find this information will be to check your router’s web interface. Your router hosts your Wi-Fi network, so it has the most accurate data about which devices are connected to it. Most routers offer a way to view a list of connected devices, although some may not.
The standard tips for accessing your router’s web interface apply. If you’re not sure of its IP address, you can generally look for your computer’s gateway IP address via the Control Panel. You could also run the ipconfig /all command in a Command Prompt window.

ipconfig – Quickly Find Your IP Address

You can find your IP address from the Control Panel, but this takes quite a few clicks. The ipconfig command is a fast way of determining your computer’s IP address and other information, such as the address of its default gateway — useful if you want to know the IP address of your router’s web interface.
To use the command, just type ipconfig into a Command Prompt window. You’ll see a list of all the network connections your computer is using. Look under Wireless LAN adapter if you’re connected to Wi-Fi or Ethernet adapter Local Area Connection if you’re connected to a wired network.

ipconfig-command[4]

Next, plug this IP address into your web browser’s address bar and press Enter. This should usually bring up your router’s interface. If it doesn’t, check your router’s documentation — or perform a web search for its model number and “web interface” to find out how to access it. If you haven’t set a custom password and passphrase, you may need to perform a search or check the documentation to find the default ones for your model of router.

Finding the List of Connected Devices

You’ll now need to look for the option in your router’s web interface somewhere. Look for a link or button named something like “attached devices,” “connected devices,” or “DHCP clients.” You may find this on the Wi-Fi configuration page, or you may find it on some sort of status page. On some routers, the list of connected devices may be printed on a main status page to save you some clicks.
On many D-Link routers, a list of connected devices is available under Status > Wireless.


On many Netgear routers, you’ll find the list under “Attached Devices” in the sidebar.


On many Linksys routers, you’ll find this option under Status > Local Network > DHCP Clients Table.


On Comcast Xfinity routers, you’ll find the list under Connected Devices in the sidebar.

Fix Google Chrome : "Virus Scan Failed" Error


Google chrome is one of the fastest browser to surf the internet and to download stuffs online, sometime you get an error when you download any thing from web that is “Failed- Virus Scan Failed” this error occurs when google chrome becomes unable to check for the security certificate for any download from their publisher.
This happens due to virus or malware on your computer which may be any adware or browser virus or hijacker.


This is annoying when you download any antivirus to scan your computer but this is also unable to download.
Here is best solution for this problem-
Step 1. Press Windows button + R key at the same time


and you will get “Run” dialog box.


Step 2. Type “regedit” and hit ok. Now you will get registry editor window.


Step 3. Navigate to-
HKEY_LOCAL_MACHINE >SOFTWARE >Microsoft >Windows >CurrentVersion >Policies >Attachments
by expanding the folder tree.


Step 4. Now double click on “ScanWithAntivirus” registry key and change its value to “1” which is by default “3“. Changing the key value to “1” actually tells the browser not to scan for the downloaded program or files.

Watch This Video Tutorial For More Explanation


After doing above steps you will be able to download from google chrome, if you have same issue on other browsers then download and install Hitman Pro for your computer and scan your computer, after scanning you will be able to download programs and files in all browsers.
Once you have done change the registry key value to its original value that is 3.

Another Method to Fix Virus Scan Failed Error.

If the above method is difficult to perform or you are unable to locate correct registry key, then here is simple method available, all you have to do is download this patch and run it.

Download this file and extract it, now open the file “Virus Scan Fix” and you will get warning message, Click on Yes.

Virus scan failed

After running this Registry patch you will get a success message and click on OK.

Failed virus scan registry fix

Thats All, you are done now your download will not give any error, to make sure your computer does not have any virus install Hitman Pro and Scan your computer once.

All Fixed Random Reboot And Freeze Problems (solution)


RAM: To find out if it’s specific to hardware, download Memtest86+ ISO Image and burn it to a disk. Then boot from the disk and run Memory Diagnostic for 8 to 9 passes. It’s must be allowed to run up to 8 or 9 passes, to find out if it’s RAM that is causing the problem. Even a single error means there is something wrong with either RAM or DIMM slot. So you have to run MemTest with individual slots with individual RAM. Check the Motherboard manual and see that the voltage and timings are set correctly in the BIOS. Also check and ensure that the RAM is compatible with the board.

Hard drive: Next we have to test the Hard Drive condition. Find out the manufacturer of your Hard Drive and go to manufactures website. Most of the manufactures will have their own diagnostic tools. So run a complete diagnostic and check the stability of the Hard Drive. If you find a lot of bad sectors or error immediately start backing up your data. Then run chkdsk to see if that corrects the problem. If not, then if it is covered by warranty, send for RMA.

BIOS: Sometimes changing the settings in BIOS, like Overclocking the RAM or processor and cause instability for the system. In such cases, reset the BIOS to default settings or reset it by removing CMOS for a minute and put it back. Make sure the BIOS firmware is up to date.

Power Supply: Sometimes you might have a great system with latest board, processor, GPU, RAM etc. but to handle those, your PSU may not be powerful enough. Make sure you get one that can handle your hardware. Also, PSU failure can cause the system to act weird – unfortunately there is no easy way to test it. But sometimes you can hear loud noises from SMPS that would help you figure out if it’s the PSU that’s causing the problem.

Graphic Card: Sometimes a GPU can cause system instability. Maybe overheating or incorrect clock settings are the main causes. In such cases, there are a lot of stress test software, which you could run to check the stability of your GPU like FurMark etc. Also, a bad driver can also cause problems, so it might be a good idea to reinstall the drivers. Also, when you Overclock your GPU – check the manual.

Fix a Windows 7 System That Randomly Freezes:
Of all the hassles that can plague a PC user (and, trust me, there are many), few are as infuriating as random lockups.
There you are, typing along, when suddenly everything just freezes. No error message, no bluescreen, just a locked-up, unresponsive system. I've been there. I feel your pain.
If you're a Windows 7 (or Windows Server 2008 R2) user, you may be in luck: Microsoft recently issued a hotfix for systems that stop responding randomly.
What causes the problem? Microsoft says it's "a deadlock condition between the Lsass.exe process, the Redirected Drive Buffering Subsystem (Rdbss.sys) driver, and the Winsock kernel." Well, duh! That was going to be my first guess.
The hotfix is available for both 32- and 64-bit versions of Windows 7. (Fun fact: you'll often see these versions represented as "x86" and "x64," respectively.) To get it, click View and request hotfix downloads, accept Microsoft's terms, choose the hotfix compatible with your system, and then provide your e-mail address.
Click Request hotfix, then check your inbox for an e-mail containing a link to the download. (I'm not sure why Microsoft makes you jump through these hoops, but, then again, I'm not sure why Microsoft does half the things it does.)
If you've encountered this random-lockup problem, let me know if this hotfix fixes it!


Forum Discussions (Solution)

My computer freezes randomly, what can I do to fix this?

I tried to run check disk and it retuned no errors or bad sectors. I also run CCleaner and also no effect.
What else can I do to determine the problem and solve it?
OS: Windows 7
I installed different application for data recovery and uninstalled them. Also I uninstalled any application that I installed recently
EDIT: I need to do hard reset to get out of freeze state
EDIT1: In safe mode it doesn't freeze
EDIT2:(Solved) I disabled all the services and the programs that loads on startup accept for security & microsoft services. My computer worked all night without freezing!


I might have the answer to your problems.  This might fix your sleep/suspend problems and your random freezing problems.  Bottom line is that the default and "auto" values in Win 7 and your BIOS might not produce a stable computer...even with a virgin install.

RANDOM FREEZES FIX:
My computer used to freeze randomly until I fixed the memory timings.  I suspected bad memory early on and tested it with MEMTEST, but it passed with flying colors.  I even tried swaping memory out, trying to eliminate bad memory and/or slots.  It turned out that it was a memory frequency/timings/voltage issue.  No more freezes!  If you have a similar setup, this will most likely fix it.  If not, then check your memory and/or power supply.

The "AUTO" settings in BIOS *may not* produce a stable setting.  You have to goto the ASUS support website and download the latest memory QVL and lookup the memory settings for your particular brand there.  For my memory (OCZX1333LV6GK(XMP)) I had to make the following adjustments in the BIOS:

DRAM Freq:1066  (even though my memory is rated at 1333 frequency, the QVL guide recommended a lower freq!)
7-7-7-16 for the rest of the timings.  The other settings I was able to leave in "AUTO"
DRAM BUS Voltage: 1.6
*warning: be sure to consult your memory/motherboard documentation...the wrong value could damage your components!


SUSPEND/SLEEP FIX:

My computer used to hang when coming out of sleep or wouldn't completely goto sleep.  This solution may be partially dependent on you fixing a random freezing issue if you have one.  

In your "advanced" power settings, disable "Hybrid Sleep".  That's it!  My motherboard doesn't like hybrid sleep.

*If you have a desktop with a UPS, Win 7 will treat it like a laptop and apply the battery settings....sooo make sure you adjust the "on battery" settings!

My setup:

Processor:Intel core i7 920
Motherboard:Asus P6T
Memory: OCZX1333LV6GK(XMP)    (ie. 6GB in 3 sticks)
Harddrive:  3 x WD Caviar Black drives in RAID 5
PSU: X3 1000W
Video card: 2 x NVIDIA 9800 GTX+ SLI


Just restarting, no blue screen.


First I would reinstall everything and update the BIOS to the newest version. Other than that it sounds like a power supply issue. It's remotely possible that it's the GPU but those tend to blue screen. RMA the PSU and get a new one to see if that resolves your problem.

Youtube Video

6 Common Problems of PC Random Restarts